Production- minimizing trial & error:
Although I do intend to supplement this blog with some education on art history, for now we'll assume you do not need assistance with story ideas or artistic inspiration, and get right down to production tips and things to avoid. I won't be identifying every single step you must take, but will emphasize certain areas to focus on to minimize the trial and error experience you might have in this process.
The first version I created of my book is at Blurb.com. They provide a very nice finished product from an exterior point of view. But I felt the interior, meaning the text managing and layout features, to be very difficult to work with. The overall end appearance of the interior seemed very "square," literally. When I used the program, there were no options for round or oval graphics. Since the time I published in Blurb, they have incorporated a MS Word feature that might make it easier to manage and edit text. But I've moved on to using Microsoft Publisher 2010 and Publishing a PDF file with Lulu.com. In the long run, I will simply bring my PDF file to a local or on-line short run printer and have them printed myself. The cost of printing my book with Blurb and Lulu ranges between $30-45 per book, depending on whether or not it is hardcover or softcover. But a short run print can cost $13.41 per book for 25 books, and even less to print per copy depending on how many books you print. Some on-line printers have minimum amounts, frequently 50 books minimum. I found one that will print a 25 book minimum- at
www.book1one.com. Many of the on-line printers have calculators on their web-site so you can get a price quote on the spot. Just remember to distinguish between the amount of pages that will be printed in color, and the amount that will be printed in black only. Books without color are by far the least expensive to produce. Of course, you also have to factor in the cost of shipping- and it may be more cost effective to use a local printer if the shipping costs are going to raise the price per book too high. But let's not jump to the end before we begin. The least expensive on-line printer I have found so far is
Createspace. I was also happy with the weight of the paper at Createspace. As Goldilocks would say, it was "just right." I found the paper weights with Blurb and Lulu to be too heavy for my style.
Although I used MS Publisher 2010, technically you can use MS Word to create your manuscript. Both of these programs allow you to save your document in PDF format that you can upload to Lulu, or bring to a printer on your own. But at least one prolific self-publisher has commented that there can be some difficulty anchoring graphics in MS Word. I seem to recall there is a feature to "anchor" graphics in MS Word, and when the graphic is anchored there is a little ship anchor symbol. Try searching the help feature to learn how to anchor graphics. The main thing to remember if you use MS Word is that you must view your document in a two page spread. If you use Blurb, this strategy should be utilized also. As I have mentioned in my videos, every chapter or a new story begins on a
right-hand page approximately 4.5 inches down from the top of the page. You'll be able to compare right and left pages in a two page spread. Sometimes, at the end of a chapter or a new story, the left hand page will be blank.
It is not a bad idea to imitate a simple book layout and format from a book on your book shelf! The front matter- title page, copyright page, and dedication pages usually do not have page numbers, although it may have Roman numerals. A Preface or Introduction generally has Roman numerals. The main body of text has regular numbers. Set your margins in the beginning, and don't forget to add a little extra to the gutter margin- the crease in the middle between pages. Here is a screen shot of the gutter margin menu in MS Word.
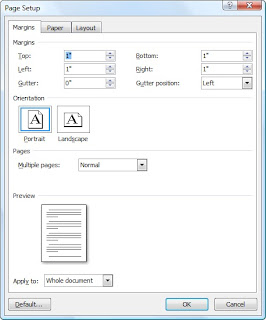
In general, printers, including Lulu print the book in batches of four pages. So, in the end the number of pages in the book must be divisible by four, and a good rule to follow is that the last page should be blank. Also, depending on the age of your audience, font size can make a difference in appearance. I'd recommend 11 pt. 12 pt might be better for very young readers. One of the benefits of printing with Lulu is that if you have a lot of illustrations, the cost of printing a trial copy (or two, or three) is the same price as the canisters of ink you might use on your home printer. At least that's the case with my ink. It costs me the same to print it at home or with Lulu, but by printing it with Lulu instead, I can see the entire finished product with front and back covers, bound, and make improvements with a better view of the end. It's also not a bad idea to search around for other publishing options with bookemon.com or flutterby.com. I have not used these programs but from what I've seen of them, they do bear some resemblance to Blurb, and on that note I can only offer an opinion that these type of template programs may be sufficient for small blocks of text, such as poetry, and more pictures or photographs to fill the book. But when it comes to large blocks of text, I can hardly recommend templates. With Microsoft Publisher you can design your document more according to your own vision, rather than one preset for you. One book that may be helpful in learning Microsoft Publisher 2010 is Using Microsoft Publisher 2010, which when purchased new includes online tutorial videos. The author is Brian Posey, and it can be purchased at Amazon.
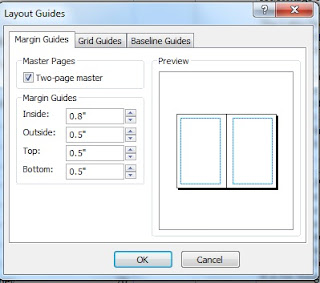
The screen capture to the left is setting custom margins in MS Publisher 2010. Margins are set under the Page Design tab on the ribbon, then click margins, and custom if it is a 6x9 custom document. Notice the margins on the inside between pages are larger than the outside margins. The inside margin is the gutter. The gutter margin set to slightly higher (.8) than the top, bottom and outside margins (.5). It's pretty important that the margins, including the gutter are set from the beginning. In a custom document, a margin has to be set for every single page.


